I’m always looking for new tools to add to my developer’s toolbox. One such tool I recently came across is StyleCop for ReSharper.
StyleCop for ReSharper is a ReSharper add-on that enables real-time syntax highlighting of StyleCop rules. Normally, you run StyleCop by selecting “Run StyleCop” from the Tools menu:

The StyleCop for ReSharper takes it one step further by providing the same analysis, but in real-time and with squigglies:
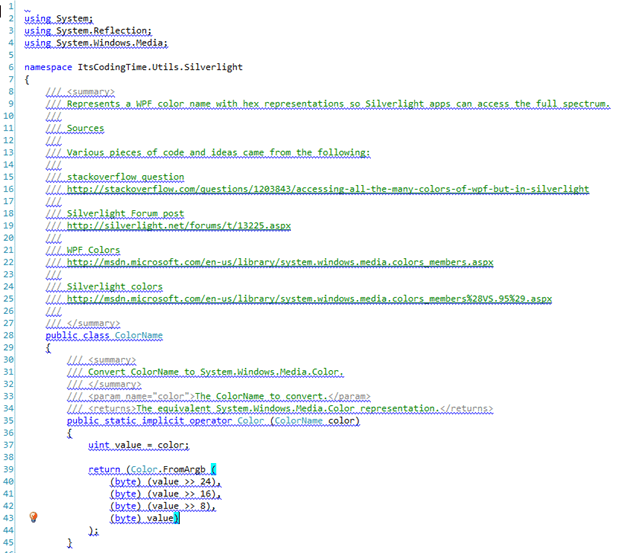
The first thing you’ll notice is that every single line has been flagged for violations! That’s kind of ridiculous. Fortunately, there’s a quick way to reduce that count by loosening up the rules a bit.
Prerequisites
Of course, to use the StyleCop for ReSharper add-on you’ll need to have ReSharper. Also, if you attempt to install the add-on without first having installed StyleCop, you’ll see this dialog: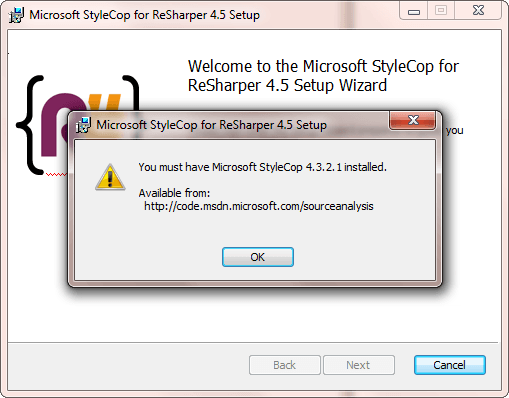
The latest version of StyleCop can be downloaded here.
Loosening up StyleCop’s Rules
Before we start modifying the default rules, let’s learn how to share a single StyleCop settings file across multiple solutions or projects.
StyleCop starts looking for a Settings.StyleCop rules or settings file in the project’s local folder first. Regardless of whether it finds one or not, it works up the folder tree, looking for other copies of the file. Once it reaches the top of the chain, it goes back to the default install folder where there should always be a the global version of the file. It is possible to override the global settings by placing a copy of Settings.StyleCop in the local solution or project file. Also, you can have global settings which are overridden by solution-level settings which in turn might be overridden by project-level settings. All depends on how granular you want to get with your rules.
Personally, I only maintain a single Settings.StyleCop file for all of my projects and solutions by putting the file at the development root (d:dev).
You’ll find the global copy of Settings.StyleCop here:
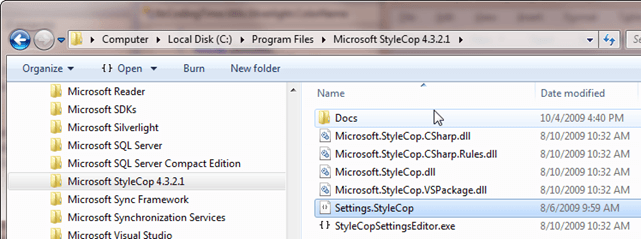
Copy that into your development tree, then double-click on it. That will bring up the StyleCop Project Settings editor:
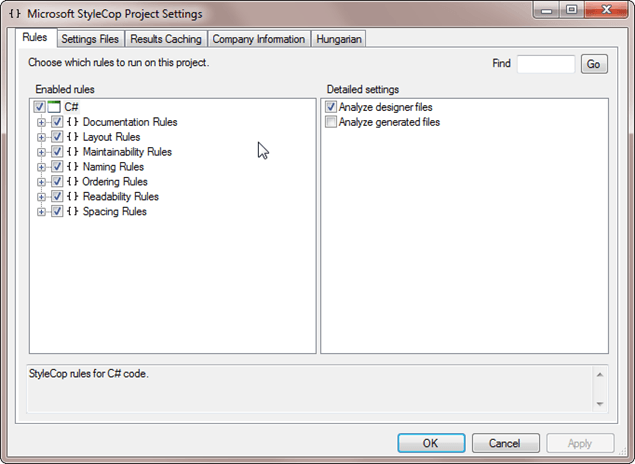
If you expand the “Enabled rules” nodes you’ll see all sorts of rules that you can turn off.
Rules I Can Live Without
Here is the list of rules that I operate without. I’ll add to this list as I get further into StyleCop’s rule set. In general, I’m trying to adhere to the rules as given, but some of them are just a bit too nitpicky for my tastes.
| StyleCop Rule | Definition | Why I Turned It Off |
| SA1000 | KeywordsMustBeSpacedCorrectly | This rule is telling me my choice of spacing around, for example, the keyword ‘typeof’ is not right. “Not right”, in this case, is in conflict to my standard formatting rules, so this one is out. |
| SA1008 | OpeningParenthesisMustBeSpacedCorrectly | This rule seems to dictate no spaces between, say, a method name and an opening parenthesis. I like have a single space between such things, so this one stays off. |
| SA1027 | TabsMustNotBeUsed | Ah, yeah. I don’t like spaces. I use tabs. |
| SA1101 | PrefixLocalCallsWithThis | In my mind, the “this” keyword is implied by its absence, and I generally do not use it unless there is some naming conflict present otherwise. |
| SA1117 | ParametersMustBeOnSameLineOrSeparateLines | |
| SA1309 | FieldNamesMustNotBeginWithUnderscore | This is in exact conflict with the style guide I use, which advocates using an underscore as the prefix on private variables. |
| SA1502 | ElementMustNotBeOnSingleLine | There are times, for example for a getter/setter property definition, where you might want everyting on one line, including the curly braces. This ones gets turned off. |
| SA1503 | CurlyBracketsMustNotBeOmitted | I think this goes a bit too far. There are times where, for readability if nothing else, it’s OK to omit the curly braces. |
| SA1512 | SingleLineCommentMustNotBeFollowedByBlankLine | Another one that is a bit too nitpicky. I’m happy just having comments in the code. Who cares about blank lines? |
| SA1515 | SingleLineCommentMustBePrecededByBlankLine | Same reasoning as SA1512. |
Rules Off By Default That I Use
The other side of turning off default rules is turning on some that are off by default. Here are those:
| StyleCop Rule | Definition | Why I Turned It Off |
| SA1124 | DoNotUseRegions | I hate regions. Nuff’ said. |
Conclusion
If we take a look at the code snippet from above we’ll see that the squiggly-indicated violations have gone way down:
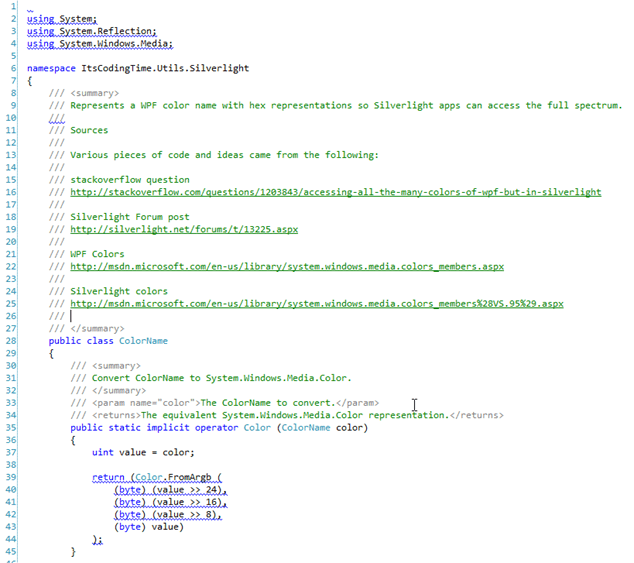
Still have some work to do, but at least it’s a bit more manageable and realistic.
Setting up a Continuous Integration System, Part 4: CI Server Baseline Software
This is the next part in an ongoing series about setting up a continuous integration system. The series includes:
- Part 1: Introduction
- Part 2: Project Folders
- Part 3: CI Workflow
- Part 4: CI Server Baseline Software (this post)
- Part 5: CruiseControl.NET Custom Plug-in: Update Version
- Part 6: CruiseControl.NET Custom Plug-in: Source Retrieval
- Part 7: Installing CruiseControl.NET and Custom Plug-ins
- Part 8: Configuring CruiseControl.NET
- Part 9: Conclusion
I’ve covered some of the basics of setting up a continuous integration system thus far: how I set up my development project folders and the general workflow of my CI environment. Now, I’d like to start getting the CI server setup with a run through what I consider baseline software for a build server.
Core Components
In order of installation, here are the “core” pieces of software installed on my CI build server (which runs Windows Server 2003). I consider these core because they’re really the absolute minimum you can get by with in a CI environment.
Visual SVN Server / Tortoise SVN
See my post on installing Visual SVN/TortoiseSVN.
CruiseControl.NET
CC.NET is, of course, the core of many CI environments. It’s the CI workflow engine, coordinating and firing off the necessary events to build source, run unit tests, etc. I’ll delve into configuring CC.NET in my next post in this series.
CruiseControl.NET Add-ons
CC.NET has an extensible plug-in architecture. I have leaned on others’ work for plug-in’s to retrieve source from TFS or VSS, and have written my own to handle version updating (check out assemblyinfo.cs, update assembly version, check-in). I’ll detail each of these as part of configuring CruiseControl.NET.
Visual Studio (VS2008 + VS2008SP1)
Why do I install Visual Studio on my build machine?
There’s really two reasons for this:
- There was a time when MSBuild (which comes with .NET; look in “WindowsMicrosoft.NETFrameworkv3.5”) would not build setup (.vdproj) projects. Unless this has changed, Visual Studio is required to build setup projects.
- I sometimes have to load up a project and do a build as I would on my development machine, sometimes just for sanity’s sake. While I don’t do development tasks on my build machine, having Visual Studio on there is a huge timesaver when things get a little screwy.
Visual Studio Team ExplorerIf you’re using TFS for source control (like we do at my place of employment), you’ll also want the TFS Explorer component. One nice thing about TFS and SVN is that they seem to play well with each other, or at least they stay out of each other’s way.
Silverlight 3 Tools for Visual Studio 2008 SP1
If you’re going to build Silverlight projects, you probably want the latest Silverlight Tools for Visual Studio. The alternative is having to pull dll’s from the default install folder and putting them into a project or solution specific imports folder.
CI Utilities
These are key pieces of software, not necessarily ‘core’, but very nearly as important because of the functionality they provide. Any good CI environment isn’t complete without at least some of them.
NUnit
NCover
I use the free version that comes with TestDriven.NET.
FxCop
TestDriven.NET
Not necessary for CI, but helps with debugging unit tests (which, as stated above under Visual Studio, is sometimes a necessity or at least a timesaver).
7-zip
My command-line zip utility of choice.
Optional Utilities
Beyond Compare
Sometimes you need to compare two files or a set of directories. This is one of the best comparison tools out there.
Those are the components and utilities I use as a baseline on my CI server. Next couple of posts I’ll take a look at some custom CC.NET plug-in’s I use as part of my CI process.
Setting up a Continuous Integration System, Part 3: CI Workflow
This is the next part in an ongoing series about setting up a continuous integration system. The series includes:
- Part 1: Introduction
- Part 2: Project Folders
- Part 3: CI Workflow (this post)
- Part 4: CI Server Baseline Software
- Part 5: CruiseControl.NET Custom Plug-in: Update Version
- Part 6: CruiseControl.NET Custom Plug-in: Source Retrieval
- Part 7: Installing CruiseControl.NET and Custom Plug-ins
- Part 8: Configuring CruiseControl.NET
- Part 9: Conclusion
Before I actually start configuring my CI server I first wanted to present the general workflow my CI process follows.
Continuous Integration Workflow
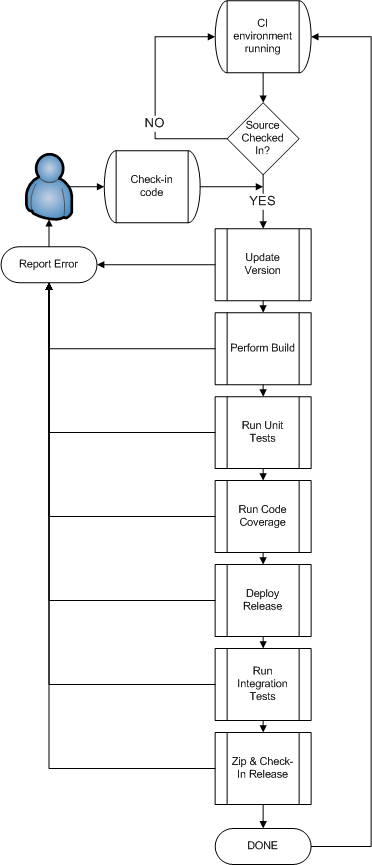
With the CI environment (server) up and running, the initial action is always a developer checking in source. From there, the CI process is completely automated up until we either hit an error or complete successfully.
On success, the output is, of course, a release candidate set of files. I generally produce many release candidates, but just because the CI environment has produced one doesn’t mean I’m going to do a production release. But I always have confidence that I could deploy a particular release candidate because I know it has gone through my unit and integration testing wringer and come out squeaky clean.

