Maybe this post should be “Part 3”, but I think of it as more of an incremental increase over Part 2 of this series, so we’ll leave it at 2.1. In any case, this is the third post in a series about a Silverlight TagCloud control I wrote that began with a discussion of the TagCloud’s back-end WCF service and then moved on to the front-end Silverlight control. This post extends the Silverlight control, adding some additional features while easing deployment.
Let’s get into it.
New Stuff
First, a quick summary of the TagCloud control changes:
1. Removed style information from app.xaml
We don’t need it anymore as this information is now passed in as initial parameters.
2. New ItsCodingTime.Utils.Silverlight dll
This utility dll contains the ColorNames class that I previously discussed. I wanted it here to ease distribution and to use in other Silverlight projects. Also, I’ll likely write a separate post (and release the full source) about the utils dll when it has some real meat in it.
3. New FontFamily initial parameter
Tag item FontFamily can now be set via a property from ASP.NET.
4. New BackgroundColor initial parameter
The control’s Background can now be set via a property from ASP.NET.
5. New TagColor initial parameter
Tag item ForegroundColor can now be set via a property from ASP.NET.
6. New TagHoverColor initial parameter
Tag item MouseOver Foreground color can now be set via a property from ASP.NET.
7. Consolidated the control’s ASP.NET and JavaScript code into a user control
The hosting ASP.NET page was getting a little messy what with all of that <object> stuff and JavaScript. While I left the silverlight.js and jquery references, as well as the onSilverlightError function, in my master page, the TagCloud specific code is now in a user control.
FontFamily, BackgroundColor, TagColor, TagHoverColor properties & the SilverlightTagCloud User Control
It’s probably best to explain the usage of the new properties and user control with an example. I’ll assume you’ve already installed the TagCloud from my previous post and want to “upgrade”.
You’ll need to copy over the SilverlightTagCloud.ascx/SilverlightTagCloud.ascx.cs files into your site’s “user control” folder (wherever that may be based on your blogging or web site platform) and add the following reference to the page which will house the control:
1: <%@ Register src="~/User controls/SilverlightTagCloud.ascx" TagName="SilverlightTagCloud"
2: TagPrefix="ucSilverlightTagCloud" %>
Once you’ve got that, you can then replace the entire <object> declaration with (replacing the colors with selections of your own, of course; for possible color names check out my post on WPF Colors in Silverlight):
1: <ucSilverlightTagCloud:SilverlightTagCloud runat="server" TagThreshold="2" FontFamily="Arial"
2: TagColor="#5C80B1" TagHoverColor="DodgerBlue" BackgroundColor="AliceBlue" MinimumFontSize="12" />
Also, there was some initialization code in the code-behind. That can all be removed.
If any of this is hard to follow, check out the sample project in the code download below.
As you can see, the end result of these changes is really focused at being able to customize the appearance of the control via settable properties. Hopefully I’ve got enough features baked in now, though adding additional properties of your own should be pretty easy.
I won’t go over the innards of the user control. It’s all the same as what I talked about before (except for the addition of the code to support the above changes), and you can readily check it out in the download. Note that the WCF service code, as before, is in “demo” mode, meaning you can uncomment the BlogEngine.NET specific code if you’re using that platform (and include a reference to BlogEngine.NET), otherwise you’ll need to plug in your own blogging platform’s tag information.
Questions, concerns, or requests for missing or new functionality, let me know.
Download: Silverlight TagCloud control on CodePlex
A Silverlight TagCloud, Part 1: The WCF Service
The complete Silverlight TagCloud series of posts:
- A Silverlight TagCloud, Part 1: The WCF Service
- A Silverlight TagCloud, Part 2: The TagCloud
- A Silverlight TagCloud, Part 2.1: Refinements
- Silverlight TagCloud Now on CodePlex
This is the first of two posts about a new Silverlight TagCloud control I wrote. The architecture is simple: On the client-end we’ll have a Silverlight control hosted in an ASP.NET page. On the server-end we’ll have a WCF service that the TagCloud communicates with to get tag item information.
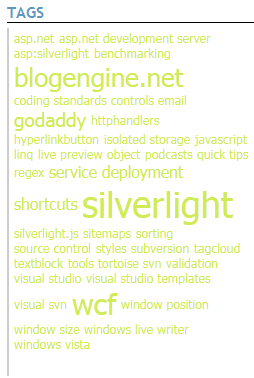
Here’s the end result (minus some CSS formatting):

Since I knew I wanted to deploy the control/service combination to two different web sites, I opted to create both control and service projects in a new Visual Studio 2008 solution rather than adding them to each of the individual web projects where I’d have duplication of code. Turns out the process of getting the WCF bindings, service config, placement of the Silverlight XAP file, references, etc. all working correctly together when the service and control are not located inside the same solution as the web project was a major chore. Long story short, I figured it all out; I’ll spare you my tales of woe and just give you the solution.
In this first post I intend to discuss the WCF service. The next post in the series will cover the Silverlight control.
Let me also add that since I use BlogEngine.NET as my hosting platform that the WCF service is tightly-bound with BlogEngine.NET’s Post class. Replacing this underlying post/tag store shouldn’t be that difficult, though, if you want to adapt this to your own blogging platform.
The TagCloudService
I started with a WCF Service Library since my thought was that a service library would make deployment to two different web sites easier (you can read about the differences between the WCF Service Application and Service Library templates here). Turns out it wasn’t any easier or harder than if I’d just started with a WCF Service Application. In any case, I started with the usual Visual Studio 2008 WCF Service Library template:

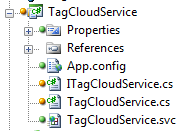
After some renames and the addition of a TagCloudService.svc file (which you would have gotten for free using the WCF Service Application template), I wound up with this structure:

You’ll notice that the TagCloudService.cs file is not tucked behind the TagCloudService.svc file in the usual code-behind manner. This is because the content of the .svc file is this:
1: <%@ ServiceHost Language="C#" Debug="true" Service="TagCloud.TagCloudService.TagCloudService" %>
No CodeBehind attribute. This is so because I’ll be deploying the compiled service DLL as the service’s implementation, and not releasing the .cs file at all.
The Contract
Let’s take a look at the service contract. Here’s the entire file:
1: using System.Collections.Generic;
2: using System.Runtime.Serialization;
3: using System.ServiceModel;
4:
5: namespace TagCloud.TagCloudService
6: {
7: [ServiceContract (Namespace = "TagCloud.TagCloudService")]
8: public interface ITagCloudService
9: {
10: [OperationContract]
11: List<CloudTag> GetTags (int threshold, string baseUrl);
12: }
13:
14: [DataContract]
15: public class CloudTag
16: {
17: public CloudTag (string tagName, string tagLink, int tagOccurrences)
18: {
19: TagName = tagName;
20: TagLink = tagLink;
21: TagOccurrences = tagOccurrences;
22: }
23:
24: [DataMember]
25: public string TagName;
26:
27: [DataMember]
28: public string TagLink;
29:
30: [DataMember]
31: public int TagOccurrences;
32: }
33: }
The service contract defines just one operation: GetTags. It takes as parameters the tag occurrence threshold, which is a minimum number of times a tag must have been used in our blog before we’ll display it in the TagCloud control, and the baseUrl, which is the hosting web site’s base address, as in . We’ll see how the base url is used in a moment. GetTags returns a collection of CloudTag objects.
CloudTag is defined with the [DataContract] attribute; it’s members are [DataMember]’s. CloudTag holds relevant information for a single tag on our blog, including the name of the tag, the url to the tag so that visitors can click on a tag in the cloud and be taken to the corresponding posts, and the number of occurrences of the tag.
The Implementation
The service implementation is rather short:
1: using System.Collections.Generic;
2: using System.ServiceModel.Activation;
3: using BlogEngine.Core;
4:
5: namespace TagCloud.TagCloudService
6: {
7: [AspNetCompatibilityRequirements (RequirementsMode = AspNetCompatibilityRequirementsMode.Allowed)]
8: public class TagCloudService : ITagCloudService
9: {
10: public List<CloudTag> GetTags (int threshold, string baseUrl)
11: {
12: var cloudTagCollection = new List<CloudTag> ();
13:
14: if (Post.Posts == null)
15: {
16: return (cloudTagCollection);
17: }
18:
19: // get all tags and the number of times each occurs
20: var sortedDict = new SortedDictionary<string, int> ();
21: foreach (var post in Post.Posts)
22: {
23: if (!post.IsVisible) continue;
24:
25: foreach (var tag in post.Tags)
26: {
27: if (sortedDict.ContainsKey (tag))
28: sortedDict[tag]++;
29: else
30: sortedDict[tag] = 1;
31: }
32: }
33:
34: // we have all the tags. only save those that meet our minimum occurrences threshold
35: foreach (var tag in sortedDict)
36: {
37: if (tag.Value > threshold)
38: {
39: cloudTagCollection.Add (new CloudTag (tag.Key, baseUrl + "/?tag=/" + tag.Key, tag.Value));
40: }
41: }
42:
43: return (cloudTagCollection);
44: }
45: }
46: }
The main part is, of course, the GetTags operation, which utilizes BlogEngine.NET’s Posts collection to retrieve all tags and the number of times each appears across the blog. It then adds only those tags that meet the minimum threshold to the CloudTag collection. This collection is then what is returned to the consuming app, which in this case will be the Silverlight control.
Deployment
You can deploy the WCF service right now (since nothing is actually using it yet). I’ve written a couple of posts on how to do that, but what you basically need to do is make the needed changes to your web.config, then copy over the .svc and assembly DLL. You can then access the service to make sure it’s running with, for example, /TagCloudService.svc.
Conclusion
As you can see the WCF service part of the implementation is pretty straightforward. Deployment of the service is (hopefully) no more difficult.
The second part of this post will discuss the consumer of this service: the Silverlight TagCloud control. Until then.
Download: Silverlight TagCloud control on CodePlex
BlogEngine.NET, GoDaddy, and Email Settings
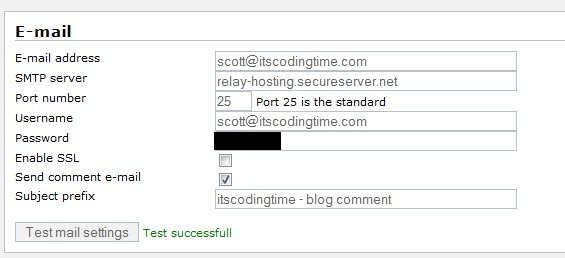
I like to receive email notifications when new comments are posted to my blogs (especially when they’re spam comments as I like to delete those right away). The problem is that I can’t use the same outgoing mail server settings that I use in my email application in BlogEngine’s email settings. When I do, I get:

Not good.
After some digging, I came across this post by Donn Felker, which mentions using relay-hosting.secureserver.net as the outgoing SMTP server. Plug it in, and this is what I get:

Success! It’s nice to have an easy fix every once in a while.
References
Installing BlogEngine.NET on GoDaddy Shared Hosting (see bottom of post)
Setting up Your Email Account in the Email Control Center
URL Regular Expression Validation
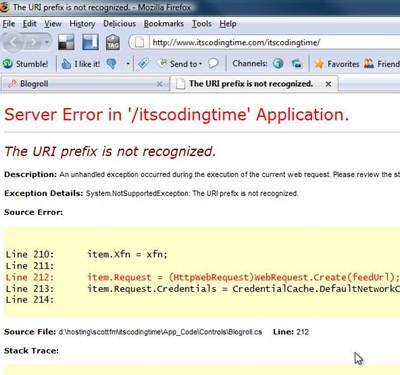
I was adding some feeds to my blogroll recently, not really thinking about what I was doing, until I went to my blog’s home page and got this:

Luckily I was doing periodic refreshes, just to see how the list was coming along, so it was easy to identify the culprit:
feed://http//underground.infovark.com/feed/
Look a little strange?
Here’s the offending code from “App_CodeControlsBlogroll.cs”, which throws the exception when attempting to display the feeds in my blogroll:
Line 211:
Line 212: item.Request = (HttpWebRequest)WebRequest.Create(feedUrl);
Line 213: item.Request.Credentials = CredentialCache.DefaultNetworkCredentials;
Specifically, line 212 tries to do a Create on the bad URL and hits the NotSupportedException.
Fortunately, this sort of behavior can easily be stopped before it becomes an issue by fixing the problem at the source. We’re going to add a couple of regular expression validators at the point at which we add the feeds, thereby preventing the error condition from arising in the first place. Of course, even with this, you’ll want to go into the Blogroll.cs control and wrap the “Create” in a try/catch. It’s just good programming sense.
If you’re using BlogEngine.NET, this step-by-step should be pretty straightforward:
1.) Open up “adminPagesBlogroll.aspx”
We’re going to modify the aspx file instead of the code-behind. You really can go either way, but this seemed the cleaner approach.
2.) Add two “RegularExpressionValidator” controls
There are two input fields we are concerned with: the Web URL text box and the RSS URL text box. First, comment out both “RequiredFieldValidator” controls. We don’t need those. Then, add two RegularExpressionValidator’s so your code looks like:
1: <label for="<%=txtWebUrl.ClientID %>" class="wide"><%=Resources.labels.website %></label>
2: <asp:TextBox runat="server" ID="txtWebUrl" Width="600px" />
3: <%--<asp:RequiredFieldValidator runat="Server" ControlToValidate="txtWebUrl" ErrorMessage="required" /><br />--%>
4: <asp:RegularExpressionValidator runat="Server" ControlToValidate="txtWebUrl" ErrorMessage="Invalid URL" ValidationExpression="[a-zA-Z0-9-.]+.[a-zA-Z]{2,3}(:[a-zA-Z0-9]*)?/?([a-zA-Z0-9-._?,'/\+&%$#=~])*" /><br />
5:
6: <label for="<%=txtFeedUrl.ClientID %>" class="wide">RSS url</label>
7: <asp:TextBox runat="server" ID="txtFeedUrl" Width="600px" />
8: <%--<asp:RequiredFieldValidator runat="Server" ControlToValidate="txtFeedUrl" ErrorMessage="required" /><br />--%>
9: <asp:RegularExpressionValidator runat="Server" ControlToValidate="txtFeedUrl" ErrorMessage="Invalid URL" ValidationExpression="[a-zA-Z0-9-.]+.[a-zA-Z]{2,3}(:[a-zA-Z0-9]*)?/?([a-zA-Z0-9-._?,'/\+&%$#=~])*" /><br />
The important properties include “ControlToValidate”, which ties the validator to the text box:
1: ControlToValidate="txtFeedUrl"
and “ValidationExpression”, which contains our regular expression:
1: ValidationExpression="[a-zA-Z0-9-.]+.[a-zA-Z]{2,3}(:[a-zA-Z0-9]*)?/?([a-zA-Z0-9-._?,'/\+&%$#=~])*"
The regular expression looks pretty cryptic (they all do), but it should provide proof against such malformed URL’s as the one I started this post with.
To test it out, let’s give the new validator a try. Here’s what I get when I try to add a new blogroll using the “bad” URL:
![]()
Looks good, and no more yellow screen of death.

