CruiseControl.NET has an extensible plug-in architecture. While documentation on how to take advantage of it is sparse, there are some sources I’ve found helpful: Custom Builder Plug-in, which is a tutorial on how to write a plug-in derived from ITask, and the TFS Plug-in for CruiseControl.NET project on CodePlex, which is a great code resource for writing a plug-in derived from ISourceControl.
In this post I’ll discuss two custom plug-ins, both derived from ISourceControl, whose shared purpose is to retrieve source code prior to a build. The only difference is that one interfaces with Subversion while the other, Team Foundation Server. While there are obviously coding differences because of this, the general workflow of each plug-in is the same.
CruiseControl.NET Assembly References
There are minimally two dll’s you will need to add as references to any CC.NET plug-in project: ThoughtWorks.CruiseControl.Core.dll and NetReflector.dll. The Core dll contains the interfaces and other goodness; NetReflector contains the attributes you’ll need to mark your classes, methods, etc. so CC.NET knows what to do with it. Once you’ve installed CruiseControl.NET, you’ll find both of these assembles in the C:Program FilesCruiseControl.NETserver folder.
Writing a CC.NET Custom ISourceControl Plug-in
Writing an ISourceControl plug-in is very similar to creating an ITask plug-in. Rather than duplicate work by writing up on my own tutorial, I’ll instead refer you to the Custom Builder Plug-in, which takes you step-by-step on how to write an ITask plug-in. Also, refer to the TFS Plug-in for CruiseControl.NET project as that contains a lot of good information.
A Word About CI Source Control Tasks
Retrieving source is the first and one of the most fundamental steps in any CI workflowprocess:

If source has not changed, CC.NET pauses and checks again later. If source has changed, it will do a ‘get’ and proceed with a new build. The ‘get’ part is where our ISourceControl-derived plug-in comes in.
Before I jump into the plug-ins, a quick word about how I solved the “update version never-ending loop” problem: as described in Part 5 of this series, my Update Version task updates each assembly’s AssemblyFileVersion attribute in each of the AssemblyInfo.cs files before checking that file into source control. The next time CC.NET runs, it sees that change, picks it up, and does another build. This creates a looping situation since, once again, the version is updated and checked in so that the next time CC.NET checks for new source… I’m sure you can see where this is going. The way I solve this is to have the Update Version task add a special marker into the source file’s comment on check-in. When the Get Source plug-in sees that marker, it ignores the file. If that’s the only change, it goes back to sleep. No looping. Problem solved.
Get Source Plug-in for Subversion
I’ll start with a class derived from ISourceControl:
1: namespace ccnet.svnget.plugin
2: {
3: [ReflectorType ("svnget")]
4: public class SVNGet : ISourceControl
5: {
Deriving from ISourceControl requires us to implement a handful of methods. We’ll get to those in a minute. For now, note the ReflectorType attribute, which names the task for use by CC.NET.
Like the Update Version plug-in from the previous post, I define the special marker which this plug-in will be looking for in the source control comment:
1: private const string _marker = "***NO_CI***"; // if present in comment, ignore file
A few properties:
1: /// <summary>
2: /// Subversion username, can be set in TortoiseSVN settings if installed.
3: /// </summary>
4: [ReflectorProperty ("username", Required = false)]
5: public string Username { get; set; }
6:
7: /// <summary>
8: /// Subversion password, can be set in TortoiseSVN settings if installed.
9: /// </summary>
10: [ReflectorProperty ("password", Required = false)]
11: public string Password { get; set; }
12:
13: /// <summary>
14: /// The local working folder where Subversion commands will be run.
15: /// </summary>
16: [ReflectorProperty ("workingDirectory")]
17: public string WorkingDirectory;
18:
19: /// <summary>
20: /// The SVN executable, including path if necessary.
21: /// </summary>
22: [ReflectorProperty ("executable")]
23: public string Executable;
Similar to how the ReflectorType attribute defines the CC.NET task, ReflectorProperty defines properties for the task. Note that if you are using Visual SVN/TortoiseSVN, you can set your credentials through those applications and do not have to add them as properties in your ccnet.config file.
Now, there are a number of methods you must implement when deriving from ISourceControl. Here’s a few I didn’t do much with:
1: public void LabelSourceControl (IIntegrationResult result)
2: {
3: return;
4: }
5:
6: public void Initialize (IProject project)
7: {
8: return;
9: }
10:
11: public void Purge (IProject project)
12: {
13: return;
14: }
Let’s move on to something more interesting…
GetModifications is an ISourceControl method we implement to retrieve a list of modified files:
1: /// <summary>
2: /// Retrieves a list of modified files from Subversion.
3: /// </summary>
4: /// <param name="from"></param>
5: /// <param name="to"></param>
6: /// <returns>A list of files modified in source control.</returns>
7: public Modification[] GetModifications (IIntegrationResult from, IIntegrationResult to)
8: {
9: var modifications = new List<Modification> ();
10:
11: if (!GetModifiedFiles (ref modifications))
12: {
13: Log.Info ("Failed checking for source modifications.");
14: }
15:
16: return (modifications.ToArray ());
17: }
All of the works happens in GetModifiedFiles, which is jam-packed with action. It’s a big method, too. I’ll go over it in pieces.
The first thing I do is run an SVN status command using our RunProcess helper (see source code download below for more info on how RunProcess works), using the –u flag to retrieve file status for those files that have changed in the repository:
1: argBuilder = new ProcessArgumentBuilder ();
2: argBuilder.AppendArgument ("status -u"); // -u will give us an '*' for those files that have changed on the server
3: argBuilder.AppendArgument (WorkingDirectory);
4: AppendCommonSwitches (argBuilder);
5:
6: var result = RunProcess (argBuilder);
What this does is give us a list of potentially changed files which we’ll then iterate through (this is the first part of the iteration loop):
1: var potentiallyModifiedItems = result.StandardOutput.Split (newline);
2: foreach (var svnItem in potentiallyModifiedItems)
3: {
4: // the standard output contains double end of line's, so we'll wind up with some blank entries here
5: if (string.IsNullOrEmpty (svnItem)) continue;
6:
7: if (svnItem[0] == '?') continue; // item not under source control
8:
9: // 'M' indicates modified item
10: if (svnItem[8] != '*') continue; // no '*' = file has not changed on server
11:
12: var file = svnItem.Substring (21); // full path + file (if not a directory) starts at the 21st 0-indexed position
13:
14: // need to examine log for our marker, which if found will tell us to ignore this changed file
15: argBuilder = new ProcessArgumentBuilder ();
16: argBuilder.AppendArgument ("log -r HEAD"); // get the latest (i.e., HEAD) log info
17: argBuilder.AppendArgument (file);
18: AppendCommonSwitches (argBuilder);
19:
20: result = RunProcess (argBuilder);
We filter out some of the results, then, once we have a candidate file, we examine the source comment for our special marker. If the marker is found, we ignore the file, otherwise we process it:
1: if (!result.StandardOutput.Contains (_marker))
2: {
3: // modified file has not been "marked", so add to modifications list
4:
5: // example log output (the whole thing is contained within 'infoLines'):
6: //
7: // ------------------------------------------------------------------------
8: // r309 | scottfm | 2009-08-28 20:57:18 -0500 (Fri, 28 Aug 2009) | 1 line <-- Line 1; split into modificationAttributes
9: //
10: // ***NO_CI*** AssemblyFileVersion updated from version [1.0.1.8] to [1.0.1.9]. <-- Line 3
11: // ------------------------------------------------------------------------
12:
13: var infoLines = result.StandardOutput.Split (newline);
14: var infoLinesList = new List<string>();
15:
16: // a lot of massaging of stdout output... see download for full source
17:
18: // version info
19: var versionString = modificationAttributes[0].Substring (1);
20: var version = Convert.ToInt32 (versionString);
21:
22: // modified date/time
23: var findFirstSpace = modificationAttributes[2].IndexOf (' ');
24: var findSecondSpace = modificationAttributes[2].IndexOf (' ', findFirstSpace + 1);
25: var datetime = modificationAttributes[2].Substring (0, findSecondSpace);
26: var modifiedDateTime = DateTime.Parse (datetime);
27:
28: var modification = new Modification
29: {
30: UserName = modificationAttributes[1],
31: Comment = infoLines[3],
32: ChangeNumber = version,
33: ModifiedTime = modifiedDateTime,
34: Version = versionString,
35: Type = string.Empty,
36: FileName = Path.GetFileName (file),
37: FolderName = Path.GetDirectoryName (file)
38: };
39:
40: modifiedFilesList.Add (modification);
There’s a lot of massaging of the stdout output; I left that out of the above snippet so we can get to the good stuff, which is to build up a Modification object and add it to our modifiedFilesList collection. Since the collection was passed in using the ‘ref’ keyword, the list we build here is passed back by reference to GetModifications whereupon it is returned to CC.NET.
The last part of this plug-in is to actually get the source from SVN so CC.NET can build it. We do that with the ISourceControl method, GetSource (It’s of some confusion when coming from the Visual SourceSafe or TFS world that the equivalent of a ‘get’ is actually termed an ‘update’ in SVN). In GetSource, we’ll perform an SVN update in order to retrieve files that been modified and checked-in to source control:
1: /// <summary>
2: /// Retrieves changed files from source control.
3: /// </summary>
4: /// <param name="result"></param>
5: public void GetSource (IIntegrationResult result)
6: {
7: // we'll run an svn update to retrieve modified files
8:
9: var argBuilder = new ProcessArgumentBuilder ();
10: argBuilder.AppendArgument ("update");
11: argBuilder.AppendArgument (WorkingDirectory);
12: AppendCommonSwitches (argBuilder);
13:
14: var runProcessResult = RunProcess (argBuilder);
15:
16: Debug.WriteLine (string.Format ("SVN update output [{0}]", runProcessResult.StandardOutput));
17: Log.Debug (string.Format ("SVN update output [{0}]", runProcessResult.StandardOutput));
18:
19: return;
20: }
RunProcess runs an SVN update on our working directory. This has the effect of retrieving any source that has been modified since the last time we did an update. With that, we’re ready for CC.NET to perform our build.
For reference, here’s the task as defined in the ccnet.config file:
1: <sourcecontrol type="svnget">
2: <executable>c:program filesVisualSVNbinsvn.exe</executable>
3: <workingDirectory>c:devsolutionsSilverlightTagCloud</workingDirectory>
4: </sourcecontrol>
I’ll be going over CC.NET’s ccnet.config file in Part 8 of this series.
That’s it for the Get Source SVN plug-in.
Get Source Plug-in for TFS
I won’t go into a lot of detail on the Get Source Plug-in for TFS as it is very similar to the Update Version Plug-in for TFS discussed in my last post. Besides for that, I didn’t write this plug-in. Credit Martin Woodward with that Herculean feat. I did, however, make one small change to his code to handle my special marker scenario.
That code is:
1: // 2009-05-01 - sfm - ignore code change if comment contains "***NO_CI***"; this will prevent recursive builds on version updating
2: Log.Debug (string.Format ("Checking for NO_CI flag for project [{0}]...", from.ProjectName));
3: if (comment.Contains ("***NO_CI***"))
4: {
5: Log.Info ("Ignoring file");
6: continue;
7: }
Which quite simply looks for the marker. If it finds it, the file is ignored inasmuch as the change set is concerned.
For reference, here is how one might define this task in CC.NET’s ccnet.config file:
1: <sourcecontrol type="vsts" autoGetSource="true" applyLabel="false">
2: <server>http://tfs-server/</server>
3: <project>$/MyProject</project>
4: <workingDirectory>c:MyProject</workingDirectory>
5: <workspace>CCNET</workspace>
6: </sourcecontrol>
Conclusion
This plug-in stuff is exhausting! But we’re done now. Hopefully between this post and the last one you have enough information to write just about any CruiseControl.NET plug-in you might ever need.
Note that the download contains my modified version of Martin Woodward’s TFS Plug-in for CruiseControl.NET. I can’t guarantee I have the latest and greatest source for that, so visit the CodePlex site if you want to start with his newest code.
Also, the CCNETPlugins download contains both the Get Source and Update Version plug-ins.
Download: CCNETPlugins.zip
Resources
NetReflector: One Minute Introduction
Custom Builder Plug-in
TFS Plug-in for CruiseControl.NET
VSTSPlugins
How to install Visual SVN
Introduction
I’m a long time user of—cough, cough—Visual SourceSafe, both at work and home. At home it’s done pretty well. At work, with dozens of users, not so much. We’re solving the problem at work by migrating to Microsoft Team Foundation Server. This has prompted me to think about my home/personal solution for source control. While I could continue to use VSS, I thought it was time to take a look at Subversion, which I’d heard a lot of good things about. Subversion is free to inexpensive, it’s open source, and there are a wide variety of implementations and tools from which to choose. Factor in VSS’s most debilitating feature, or lack thereof, that being remote access, and moving to the right Subversion package was a no-brainer.
So, what exactly is Subversion? From the Subversion project page:
Subversion is an open source version control system.
Simple as that, if only there weren’t so many implementations. Fortunately, I’d done some prior research about a year ago when the idea of moving away from VSS started nagging at me, so I already had an idea which package I wanted to use. As if you couldn’t tell from the title of this post, that implementation is Visual SVN. In this post, I’ll take you through the installation of both the server and client pieces. Note that while the server piece is free, the client costs $49. You can get by with just Tortoise SVN (which is free) on the client-side, but I wanted a solution that integrates with Visual Studio.
Why Visual SVN?
First, why Visual SVN?
- Regarded as one of the better SVN implementations
- Integrates with Visual Studio 2008 (this is a must-have requirement)
- Server is accessible remotely over http/https (this is a must-have requirement)
- While not free, the cost of the client is minimal (the server is free)
What You Need to Get Started
There are three downloads you’ll need:
1.) Visual SVN Server (cost: free)
2.) Visual SVN Client (cost: $49; you can download, install, and try it out during the trial period)
3.) Tortoise SVN (cost: free; Visual SVN recommends installing Tortoise SVN as it utilizes Tortoise for much of the file system/Windows explorer integration)
Get those now.
Installing the Visual SVN Server
Installing the server is pretty straightforward. I’m going to install on my home Windows 2003 server. You can probably install on your local machine, but I wouldn’t recommend it. It’s better to have your source control repository on a separate box for safety if nothing else. I do have the added bonus of being able to access my home server from any location (including SVN once it’s installed), so I definitely want my repository there.
1.) First, locate the Visual SVN Server msi and double-click it. Click-through any pesky security warning dialogs until you see:

2.) Click ‘Next’. You’ll see:
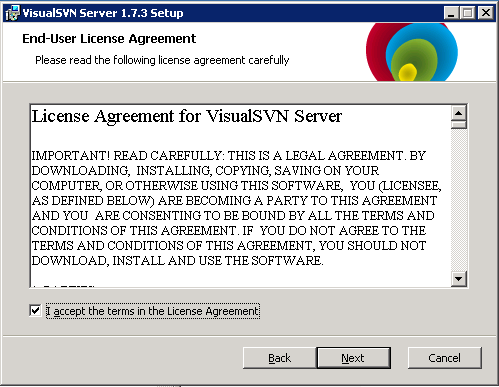
3.) Accept the licensing terms and click ‘Next’. Now we get to the meat of the install:
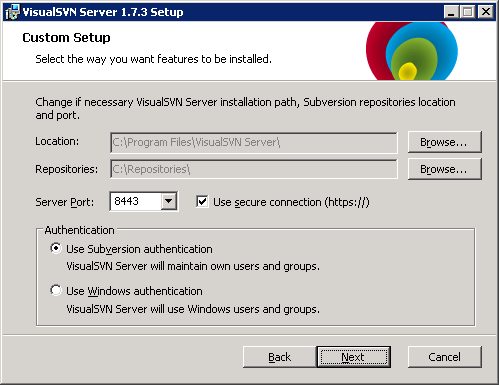
I was happy with all the defaults but for the Authentication selection. I chose to select “Use Windows Authentication” because my Windows 2003 server already acts as a domain controller, so I figure why not use my existing credentials?
A brief breakdown of the other items:
- Install Location is what it is; change if you like.
- Repository, again, is up to you. I left it alone.
- Server Port is the port Visual SVN Server will listen on for incoming connections.
- I chose to keep Use secure connection checked. I’m not that concerned with security (most of my personal/home projects are available via this blog, anyway), but I figure if it’s there and it works, why not?
- As above, I selected “Use Windows Authentication” as my Authentication scheme.
When you’re happy with your selections, click ‘Next”.
5.) Almost done. Click ‘Install’.
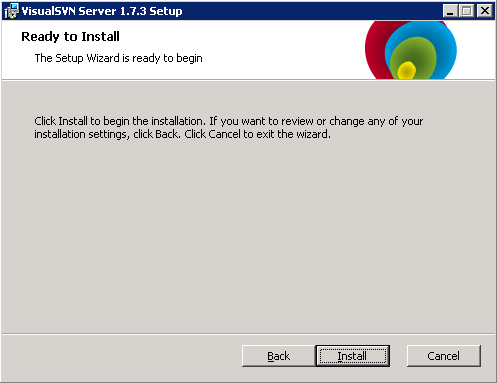
Wait while Visual SVN Server installs.
6.) Click ‘Finish’ to launch the Visual SVN Manager.
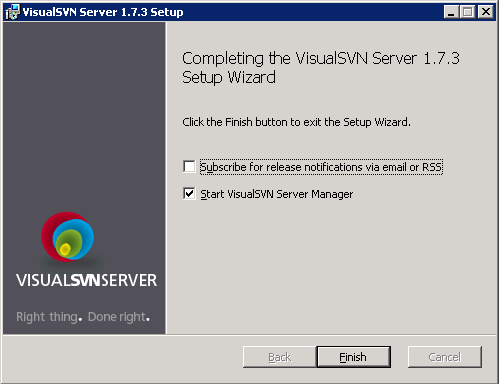
7.) With the Manager running, you’ll see the following dialog. Visual SVN Server runs as a Windows service, so the Manager is really just the management interface, and doesn’t need to run in order for you to access your source control repository.
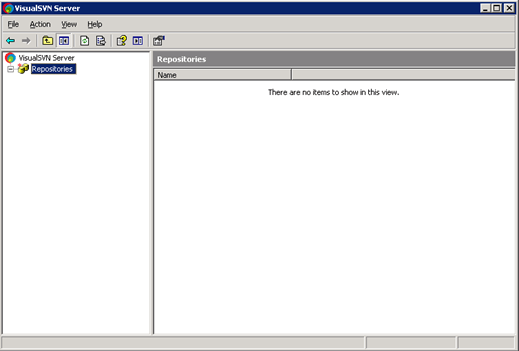
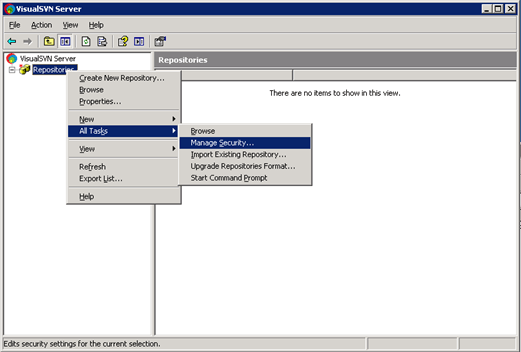
8.) Let’s add a user. Right-click on ‘Repository’, select ‘All Tasks’, ‘Manage Security…’:
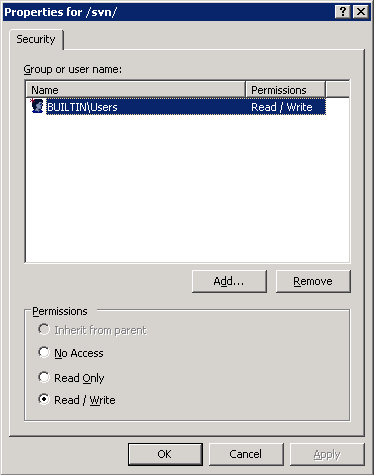
There’s a generic group already there. I removed it, and added my own domain login explicitly. By default, you’ll have read/write access.
That’s it for the server install. Let’s install the client.
Installing the Visual SVN Client
Now, let’s go through the steps to install the Visual SVN client on your development/client machine.
1.) Locate the Visual SVN client msi and double-click to install. Click-through security warnings until you see:
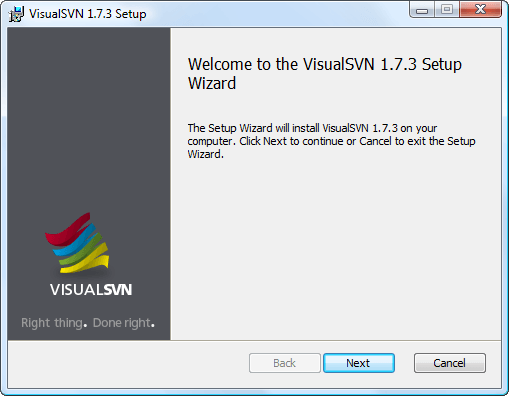
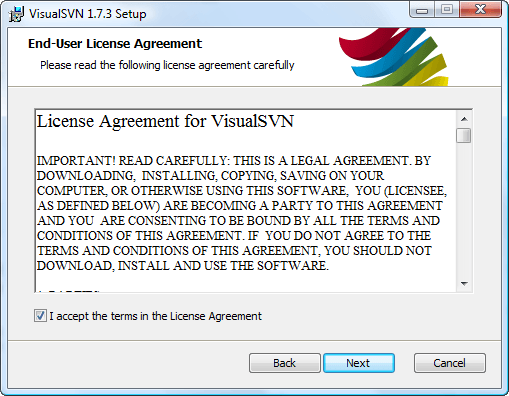
2.) Click ‘Next’ and you’ll see the following dialog. Accept the License Agreement and click ‘Next’ again.
3.) Now you’ll see this dialog:
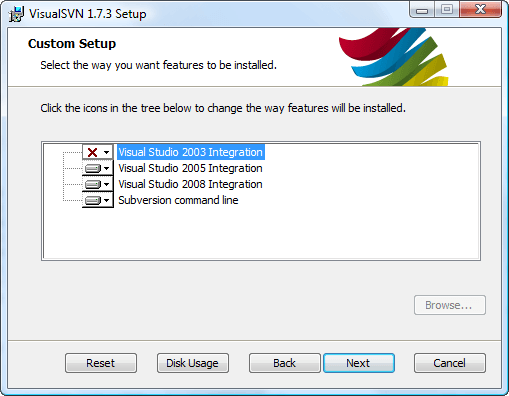
I chose to not install the “Visual Studio 2003 Integration” piece as I do not develop in VS2003 anymore. I don’t use VS2005 much either, but I figured I’d leave it just in case.
4.) Click ‘Next’ to get here:

Click ‘Install’ to install the Visual SVN client.
5.) One last dialog. If you haven’t already, you can click ‘Download Now’ to download Tortoise SVN. Tortoise provides a lot of the file-level plumbing for Visual SVN, and is a recommended (and free, though donations are accepted), complementary install. Next, we’ll go over installing Tortoise SVN.

Installing Tortoise SVN
1.) Locate the Tortoise SVN msi and double-click to install. Click-through the usual security warnings and you’ll see:

2.) Click ‘Next’, accept the licensing terms on the next dialog, and click ‘Next’ again.

3.) On the following dialog I didn’t see a need to install the ‘GB’ version of English, but I went with everything else.

4.) Click ‘Next’, then ‘Install’ to get the install rolling.

5.) You’ll notice the ‘Donate’ button on the install dialog. If you feel so inclined…

6.) That’s it. Pretty painless. Click ‘Finish’ to exit the final dialog.

7.) Oops. One more step. You may want to restart as it asks. I did.

Conclusion
To recap, my primary requirements for moving to any Subversion-based source control solution included:
- Must integrate with Visual Studio
- Must allow remote access via http/https
As far as #1, you can see below that Visual SVN gives you a new menu in Visual Studio from which you can browse your repositories and manage your source control functions.

For remote access, the Repository Browser allows me to access my server’s repository:
Of course, remember to open port 8443 (or whatever port you specified during install) on your firewall.

