I’ve taken the plunge into Android development.
Coming from the .NET world and having programmed Java a very long time ago (back in 1995, which as I recall was right about when the language first came out), I was anxious—and a bit apprehensive—about where Java stood as well as how far the tools had progressed in the fifteen or so years since I last attempted to write my first Java program.
I’m happy to say that everything is good now, though because I’ve programmed in Microsoft environments almost exclusively since leaving college there were still some small hurdles and adjustments to make in getting comfortable with the tooling.
Let’s start with the basics: Android applications are written in Java. The IDE of choice is Eclipse. Even though I’m just starting I’m seeing enough similarities between Java and some of the .NET languages (C#, specifically) that I’m beginning to think .NET wouldn’t be so great were it not for Java (or maybe it’s vice versa). In any case, the fact that there are so many similarities is a great boon to developers trying to cross-over.
For the rest of this post I’d like to go over what it takes to get started writing Android applications. I’ll try not to repeat what’s already been documented but rather point you to those sources. I’ve only been through the initial environment setup once, so parts of this will be a bit of a refresher for me, and gives me the opportunity to document the information and links for reference purposes, if nothing else.
Let’s get started.
Required Components
There are a number of downloads, including:
1. The Android SDK
This is the core of the Android development platform. At minimum, you’ll need to download and install the SDK.
2. The Eclipse IDE
You can write Android applications without an IDE, but why would you want to? Eclipse Ganymede Helios is the latest version. I downloaded and installed the “Eclipse IDE for Java Developers”, though I think you can get by with the “Classic” version as well (it looks like the former just has more “stuff” in it).
3. Android Development Tools (ADT) Plugin
A must-have if you’re going to use Eclipse for development. The ADT Plugin brings up a single dialog for new project creation and creates the basic application folder structure and minimum file set you need for a basic app.
Download & Install the SDK and Tools
If you click-through on items 1 and 3 above and check out Installing the Android SDK, you’ll get a nice step-by-step walkthrough on how to download, install, and configure each piece. Not much point in me going into detail as I think the instructions on the Android site are pretty good.
When you’ve got everything installed, read through the “Hello, World” tutorial as it goes into how to create your first Android application.
Here’s a couple more sources of information to help get you started:
Common Tasks
Common tasks and how to do them in Android.
Troubleshooting
Some of the more common issues you might run into and how to solve them.
Android FAQs
Framework, open source licensing, and security FAQs.
Writing Your First Android Application
I’m going to go over step-by-step how to go from nothing to a “stock” Android app. There really isn’t much to it, so let’s do this thing.
1.) “New” up an Android application
Assuming you installed the items listed above correctly, once you fire up Eclipse you’ll see an “Android Project” option under the “File | New” menu:

Selecting “Android Project” brings up a single dialog from which we’ll fill-out to create the new project:
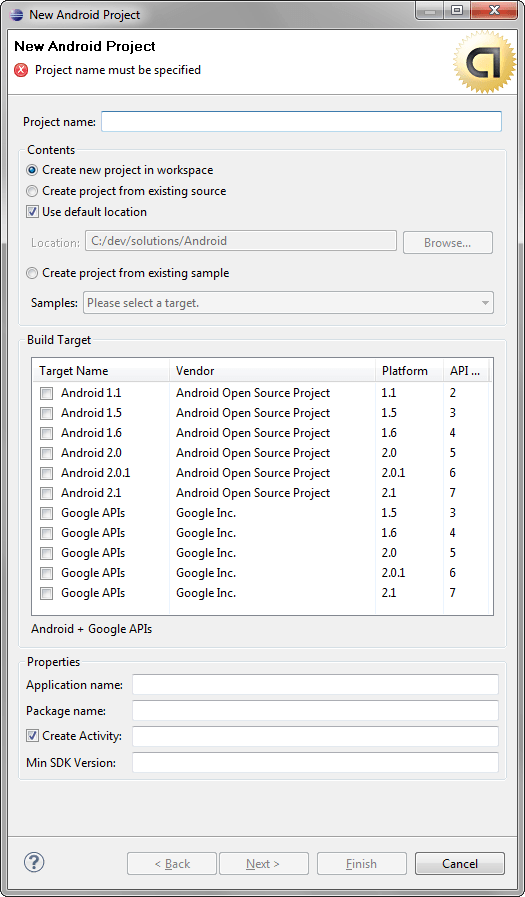
2.) Specify the Project name
This is the name of your project. Pretty self-explanatory.
You’ll see that as you fill in each section Eclipse (or, rather, the ADT Plugin) tells you what’s still missing:

3.) Create New Project or From Existing Source or From Existing Sample
You’ve got three options here:
a. Create New Project to create a project from scratch
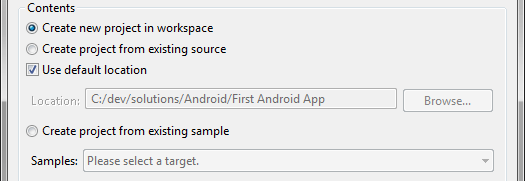
b. Create Project From Existing Source
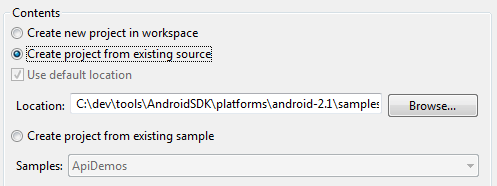
If you already have a project from another source (like one of the samples that comes with the SDK), then select the “from existing source” option and specify the project’s location.
c. Create Project from Existing Sample
If you specify a location then choose this option the dropdown will be populated with whatever projects are in that location.

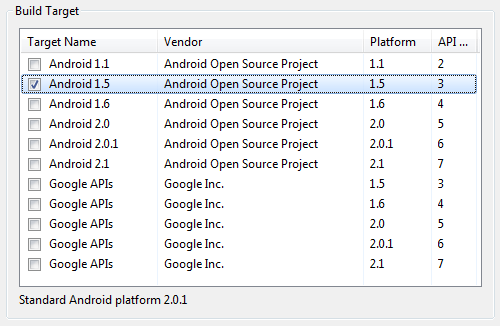
4.) Choose the Build Target
This is one of the most important selections to make because it determines which version of the Android SDK must be installed on the target device (phone) for your application to run. Specify the most minimum SDK version possible if you want your app to run on the widest selection of phones. As I write this, many phones are still running Android 1.5 or 1.6; version 2.1 is running only on the newest, most advanced phones (though many phones are getting or will get the latest update as time goes on).
For this project, I’ll just select Android 1.5:
5.) Specify Project Properties

Pretty straightforward step, though the conventions can be a bit of a mystery at first.
“Application Name” is the name of your application as it will appear on the Android device.
“Package Name” is the Java .apk package name. The naming convention for this is:
The prefix of a unique package name is always written in all-lowercase ASCII letters and should be one of the top-level domain names, currently com, edu, gov, mil, net, org, or one of the English two-letter codes identifying countries as specified in ISO Standard 3166, 1981.
Examples include:
com.sun.eng
com.apple.quicktime.v2
edu.cmu.cs.bovik.cheese
“Activity” is the subclass derived from the Android Activity parent class. While an activity is not necessary, any apps containing UI will use one as their starting point.
“Min SDK Version” is filled in automatically based on the “Build Target” selected above.
6.) Click Finish
Click “Finish” to complete the setup process and create your new project.
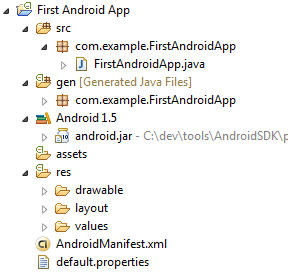
You now have the beginnings of an Android application. The starting folder structure looks like:
