Recently, I noticed a problem with my other blog where the live comment preview was not working. Chances are it broke when I upgraded BlogEngine.NET. I played around with the AJAX/JavaScript a bit, couldn’t get it to work, then had a thought: why not implement the same functionality in Silverlight?
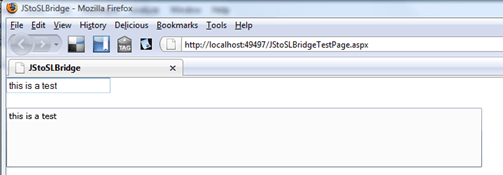
The basic idea is to have two TextBox controls, one defined in ASP.NET and the other in the Silverlight control. The former will accept user input. The latter will spit it back out (but with formatting tags specified by the user applied to the text; that functionality will be part of my next post on this project).
But before I jump into the control itself I needed to know how to pass user input from the ASP.NET control to the Silverlight control. Turns out you can do that with a JavaScript to Silverlight bridge
Create a New Silverlight Project
To start, you’ll need a basic Silverlight project (or, alternatively, you could just download the source linked at the bottom of this post).
1.) Create a new Silverlight project. I called mine “JStoSLBridge”.

Since we need an ASP.NET page to go along with this project, we’ll add a new ASP.NET Web project:

2.) As a further setup step, add the Silverlight project as a Silverlight Application in the web application.
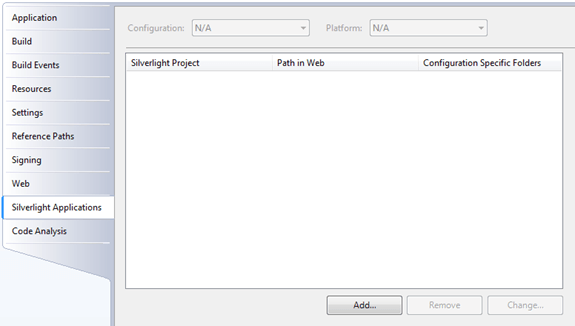
You can leave the default settings and click “Add”.

The ASP.NET/JavaScript Section of the Bridge
Let’s get started with demonstrating how to pass data from ASP.NET into a JavaScript function and then make the jump from there into our Silverlight application.
1.) This is what we have by default in the JStoSLBridgeTestPage.aspx page:
1: <%@ Page Language="c#" AutoEventWireup="true" %>
2:
3: <%@ Register Assembly="System.Web.Silverlight" Namespace="System.Web.UI.SilverlightControls"
4: TagPrefix="asp" %>
5:
6: <!DOCTYPE html PUBLIC "-//W3C//DTD XHTML 1.0 Transitional//EN" "http://www.w3.org/TR/xhtml1/DTD/xhtml1-transitional.dtd">
7:
8: <html xmlns="http://www.w3.org/1999/xhtml" style="height:100%;">
9: <head runat="server">
10: <title>JStoSLBridge</title>
11: </head>
12: <body style="height:100%;margin:0;">
13: <form id="form1" runat="server" style="height:100%;">
14: <asp:ScriptManager ID="ScriptManager1" runat="server"></asp:ScriptManager>
15: <div style="height:100%;">
16: <asp:Silverlight ID="mySLApp" runat="server" Source="~/ClientBin/JStoSLBridge.xap" MinimumVersion="2.0.31005.0" Width="100%" Height="100%" />
17: </div>
18: </form>
19: </body>
20: </html>
We’ll make some additions, including adding a TextBox to take user input and the JavaScript function which is the first part of our bridge.
Here’s the ASP.NET code:
1: <form id="form1" runat="server" style="height:100%;">
2: <asp:ScriptManager ID="ScriptManager1" runat="server"></asp:ScriptManager>
3: <asp:TextBox ID="TextBox1" runat="server" onkeyup="UpdateLivePreview()"></asp:TextBox>
4: <br /><br />
5: <div style="height:100%;">
6: <asp:Silverlight ID="mySLApp" runat="server" Source="~/ClientBin/JStoSLBridge.xap" MinimumVersion="2.0.31005.0" Width="100%" Height="100%" />
7: </div>
8: </form>
Not much to say about the addition of the TextBox other than to note the “onkeyup” JavaScript event handler which we’ll define next.
2.) Define the JavaScript event handler “UpdateLivePreview” as:
1: <script type="text/javascript">
2:
3: function UpdateLivePreview ()
4: {
5: var sl = document.getElementById ('mySLApp'); // get silverlight app
6: var str = document.getElementById ('TextBox1').value; // get current text from textbox
7:
8: sl.content.JStoSLBridge.UpdateDisplay(str);
9: }
10:
11: </script>
In this function, we get a reference to the Silverlight control and also the text value of the TextBox control. We then pass in that TextBox value into the Silverlight control via the “JStoSLBridge” object which we’ll define inside the Silverlight control itself (see below).
That’s all we need to do on the ASP.NET/JavaScript side. Now we need to define and expose the UpdateDisplay method in our Silverlight app.
Update: Just a note to help you avoid spending half a day wondering why your getElementById function call is not working when you know it should… Because of ASP.NET master page control id mangling, you might want to use:
1: function UpdateLivePreview()
2: {
3: var sl = document.getElementById('<%=mySLApp.ClientID%>') // get silverlight app
4: var str = document.getElementById('<%=TextBox1.ClientID%>').value; // get current text from textbox
5:
6: sl.content.JStoSLBridge.UpdateDisplay(str);
7: }
The Silverlight Section of the Bridge
1.) In Page.xaml, add a row definition for the Grid and a TextBox (I also modified the sizing of the control, so here’s the entire page’s XAML for reference):
1: <UserControl x:Class="JStoSLBridge.Page"
2: xmlns="http://schemas.microsoft.com/winfx/2006/xaml/presentation"
3: xmlns:x="http://schemas.microsoft.com/winfx/2006/xaml"
4: Width="680" Height="85">
5: <Grid x:Name="LayoutRoot" Background="White">
6: <Grid.RowDefinitions>
7: <RowDefinition></RowDefinition>
8: </Grid.RowDefinitions>
9:
10: <TextBox x:Name="txtPreview" TextWrapping="Wrap" Grid.Row="0" Height="85" Width="680" IsReadOnly="True"></TextBox>
11:
12: </Grid>
13: </UserControl>
I made the TextBox read-only by specifying IsReadOnly=”True”. I did this simply because I want the text to flow from the ASP.NET TextBox to the Silverlight TextBox, and don’t really want the user modifying the Silverlight TextBox directly.
2.) Now comes the really easy part: exposing a method in our Silverlight application so it can be called from JavaScript. It’s a two step process.
First, define the UpdateDisplay method with the special attribute, “ScriptableMember”:
1: [ScriptableMember]
2: public void UpdateDisplay (string strCommentText)
3: {
4: txtPreview.Text = strCommentText;
5: }
ScriptableMember is part of the System.Windows.Browser namespace, so you’ll need to add a using statement at the top of the code file.
Second, register your scriptable object with the browser’s scripting engine by adding the following line of code to the Page class constructor:
1: public Page ()
2: {
3: InitializeComponent ();
4: HtmlPage.RegisterScriptableObject ("JStoSLBridge", this);
5: }
That’s the “JStoSLBridge” object we referenced above in the JavaScript function.
You can also expose the entire class to JavaScript by using the [ScriptableType] attribute:
1: [ScriptableType]
2: public partial class Page : UserControl
3: {
Since I just want the single method exposed, though, I’ll stick with the former approach.
Compile and Run
That’s it. Run and test.
Of course, make sure you’re running the correct page and that the ASP.NET web project is set as the startup project.

You should see text displayed in the Silverlight TextBox as you type in the ASP.NET TextBox:
